
Water is a necessity for wildlife and is simple to provide. One easy way is to place a shallow birdbath in your wildscape. Keep the water level from 1 to 2 inches deep. This will allow birds to bathe in the water and to drink at their leisure. If you have a deeper birdbath, you can provide for the needs of small birds by stacking flat rocks or bricks in the water to create a shallower section. An inexpensive alternative to a concrete birdbath is to place a plastic trash can lid on the ground and fill it with water.
Water is extremely important in winter. Birds not only drink the water; they also use it to clean their feathers, which helps them maintain better insulation from the cold. You might consider investing in a water heater to keep ice from forming in your concrete birdbath. If the water in your trash can lid freezes, simply turn it over, empty the ice, and refill the lid.
Deeper water sources will be used by a greater diversity of wildlife. Following are some examples and directions for establishing wildscape water sources. Adding native water plants to these water sources can serve as an oxygen source for any animals living in the ponds as well as provide shade from the sun and cover from the prying eyes of predators.
- Patio Pond

Materials Needed
- Saw
- ¾-inch exterior plywood (4 x 8-foot sheet; but only 3 x 6-foot needed)
- Galvanized nails
- Four 1 x 2-inch boards, each 18 inches long
- Cedar or redwood for top cap (1 x 1 inches, 10 feet long)
- Water-repellent paint or stain
- Cardboard
- 6 mm to 8 mm polyethylene liner
- Hair dryer
- Utility knife or scissors
- Concrete blocks, bricks, or rocks
- Gravel
Directions
- Cut the ¾-inch plywood into four equal pieces of 18 x 36 inches. Three of these pieces will be the bottom and the two long sides. Cut the fourth piece into two equal 18 x 18-inch pieces, which will serve as the two short sides. Construct an 18 x 36-inch box from the plywood. (It can be any length, but not more than 18 inches deep.) Use the 1 x 2-inch boards to brace the four inside corners to increase the stability of the box.
- Construct a 1-inch top cap of cedar or redwood by cutting the 10-foot board into two 38-inch lengths and two 18-inch lengths. This cap will go around the top exterior of the box to hold in the liner.
- Use a water-repellent paint or stain on all wood surface areas, including the bottom.
- Line the insides and bottom of the box with cardboard to protect the liner.
- Fit the vinyl or plastic liner into the box. Use a hair dryer to soften the liner for easier folding. Allow slack for water-weight stretching. Extend the liner over the top of the box, then slide the top cap on to hold the liner in place. Trim any excess liner exposed on the outside with a utility knife or scissors.
- Place concrete blocks, bricks, or rocks in the pond at one side to provide a shallow area for birds to drink and bathe. Use an extra layer of plastic here to protect the liner. The water should be 1-3 inches deep in the shallow end. Use gravel for a top layer and provide a small branch as a perch.
- Provide cement blocks as cover for any fish. Plant rushes or grasses in a pot and submerge this in the pond. Use extra plastic beneath pots.
- To maintain the pond, simply add water and allow it to overflow for a few minutes each week.
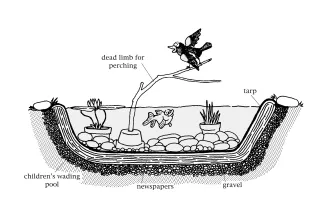
- Wading-Pool Pond
- Image
Materials Needed
- Shovel
- Plastic child-sized wading pool (rigid type)
- Gravel
- Newspapers
- Plastic tarpaulin to cover pond bottom
- Various sizes of rocks, including flat ones
- Small tree limb
- Clay pot
Directions
- Dig a hole 6 inches broader and 3 inches deeper than the size of the plastic wading pool you are using.
- Line the cavity with 3 inches of gravel. This serves as drainage for overflow water.
- Place a 1-inch layer of newspapers over the gravel to cushion the wading pool.
- Put the wading pool in the hole and line it with a plastic tarpaulin. Any excess plastic will be concealed with dirt and rocks.
- Line the inside of the pond with flat rocks. Place more rocks on one side to create a shallow area 1 – 3 inches deep, making an area for birds to drink and bathe.
- Fill the pool with water.
- Anchor a small limb in an upside-down clay pot for perching.
- Add any aquatic plants, fish, etc. only after letting the water stand for 24 hours. This allows any chlorine gas from tap water to escape before affecting the plants and animals. During the first few weeks of development, do not add water to the pond directly from the tap. Rather allow the water to sit overnight in a container so that the chlorine gas can escape.
- Place additional rocks, plants, and logs around the pond edge to create a natural appearance.
- To maintain the pond, simply add water and allow it to overflow for a few minutes each week.
- Large Pond
Materials Needed
- Shovel
- Cardboard, newspapers, or grocery bags
- Waterproof flexible liner (8 mm to 10 mm polyethylene or heavier synthetic rubber)
- Hair dryer
- Rocks of assorted shapes and sizes
- Recirculating pump (optional)
- Tubing for pump (optional)
Directions
- Dig a hole that slopes gradually to a depth of 20 to 26 inches, removing any sharp rocks. If you want a natural bottom, you need to dig deeper to compensate for backfill above the liner. The shallowest area, 2 to 8 inches deep, should extend for at least 2 feet to allow room for bog plants and bird bathing area. The middle level should be 9 to 14 inches deep to provide an area for pond plants. Eighteen inches is the recommended depth for overwintering fish.
- Smooth out the excavation, remove all sharp objects, and line the cavity with at least a 1-inch layer of cardboard, newspapers, or grocery bags to provide a cushion for the liner.
- Place the liner into the cavity and smooth it into place. Use a hair dryer to heat the plastic, making it easier to shape. Any creases you create will be unnoticeable after the pond is filled with water and will not have a negative effect on the liner’s life.
- Cover the entire liner with natural materials, such as earth, stones, logs, etc., to create a natural effect and a more permanent installation.
- Leave an area of exposed mud, if possible, for use by butterflies and nest-building birds.
- Fill the pond with water. Let the water sit for at least 24 hours before adding any aquatic plants and fish.
- Place the pump in the lowest part of the pond so that water flows to it by gravity. IF the pump must be installed outside the pond, run a screen-filtered outlet from the lowest point in the pond in a straight line to the pump. House the pump in a box to keep it safe. Also, be sure to filter the circulating water before pumping it. Always use the shortest practical route to make the mump more efficient. To avoid siphoning solids off the pond bottom, place the pump in a bucket.Accordion content.
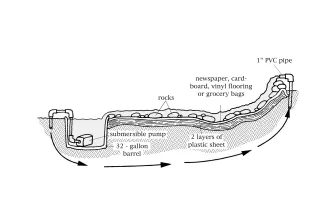
- Recirculating Stream
- Image
Materials Needed
- Hose
- Shovel
- Cardboard, newspapers, or grocery bags
- Heavy waterproof liner (at least 10 mm to 30 mm plastic sheeting)
- Duct tape
- Rocks of various sizes and shapes
- Clay (such as bentonite) for larger streams
- Sand
- Pea gravel
- 32-gallon barrel
- Recirculating pump
- 1-inch PVC tubing
- Cattle trough float
Directions
- Lay out both sides of your desired streambed with a garden hose, making it neither entirely straight nor very sharply curved. View it from all angles both outside and inside the house, making adjustments until you are completely satisfied with how it looks.
- Excavate the streambed cavity approximately 24 inches wide and 12 inches deep at a gradual slope.
- Line the cavity with a ½-inch layer of cardboard, newspaper, or grocery bag material.
- Line the cavity with plastic liner. Cover any seams with duct tape on both top and bottom.
- Carefully place a layer of 4- to 6-inch-dimaeter rocks into the streambed.
- Sprinkle dry clay between rocks. Bentonite is a swelling clay that allows water to flow on top of the streambed rather than beneath the rocks. Press firmly into place.
- Add a 1 – to 3-inch layer of sand across the rocks and clay.
- Add rocks of all sizes to the sides and bottom of the streambed.
- Sprinkle pea gravel over other materials in the streambed to “lock in” the rocks.
- Excavate a hole at the lower end of the stream deep enough to hold a 32-gallon barrel. Since the stream will run into the barrel, be sure to finish it off right up to the barrel. This is where the pump will be located.
- Bury 1-inch PVC tubing deep enough to prevent freezing, running it from the barrel to the head of the stream by the shortest route possible. The tubing can be looped over the lip of the barrel and covered with plants, or if freezing is a problem, it can be run directly through the barrel above water level but below ground level. After putting the pump into the barrel, connect it to the PVC tubing and anchor the other end of the tubing with a rock pile at the head of the stream.
- The barrel at the bottom of the stream can be covered by a lid and made to look natural with rocks and plants.
Note: The pump must be covered by water at all times. This can be accomplished by manually filling the barrel with water when the level is low or by installing a cattle trough float that will trigger the water valve to come on when the water level becomes too low. Such floats are available at livestock feed stores. See your feed store dealer for specific on installation and size.
This content originally appeared in the Wildlife Department’s “Landscaping for Wildlife” guide. The full guide can be viewed here.